 exercises that I share with you the following expertise including "base" in learning Adobe Photoshop, and outside there are so many other ways that may be easier than on my way in this tutorial. If you want understanding step by step tutorials that are much easier to be followed, I suggest you to use the tools (image) is exactly the same and you have to be creative with your own photo.

STEP 1: duplicate layer
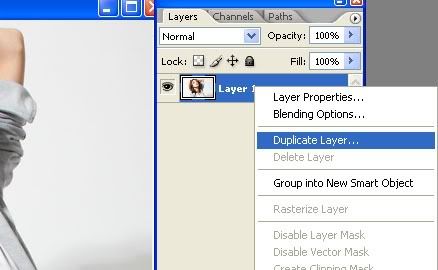
duplicate photos into two by way of 'stacked' in the layer (layer) with a view to separating the parts from a master image editing we do, such as hair part, the head, the eyes, etc. This is very important that the original photo (master photo) remained intact when the UNDO facility can no longer help you to get back miss crucial to the process previously.
Duplication steps:
* Open Photos with Adobe Photoshop application program with any version (recommended minimum CS versions)
* Come up with ways WINDOWS Layer Panel> Layers or press F7 on your computer keyboard
* After appearing as the above picture RIGHT CLICK PHOTOS> SELECT Duplicate Layer
STEP 2: select the hair area
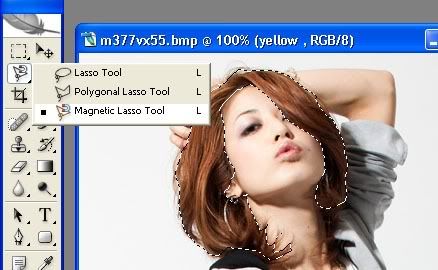
The most appropriate tool to use is the Magnetic Lasso Tool (L), why? because the tool on the tool box are Adobe Photoshop you can easily along the edges of the hair on the above model is just like a magnet attached to a metal object only (hair) it will not stick to the timber body (skin), water (ear), fabric (clothes), etc. Truly a perfect tool: D. While in a cursory manner-how to use it is follows;
* Select / Click the layer to be edited on the layer panel to the right workspace (workspace) Adobe Photoshop.
* After that, select a tool (tools) called Magnetic Lasso Tool (or press "L" on your keyboard to be directly elected)
* Click once on the edge / side of the hair object
* After that, without pressing any button on the Mouse and Keyboard follow the edges of the hair photo model.
# If you have managed to down all the edges of the hair (like the example illustration above) and between points (nodes), the beginning and the end point has been met, you can DOUBLE CLICK on the end point so that both end points can be united
# Done
STEP 3 mask effect
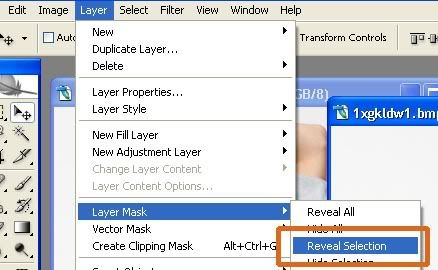
To start editing the hair area selection results that we do this, go to menu Layer> Layer Mask> Reveal SELECTION. This was done so that whatever we wish to edit and delete will not affect the original photo, but it affects only the hair color area
STEP 4: Rename Layer
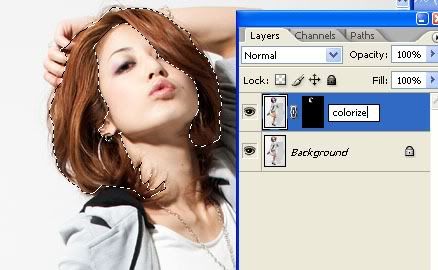
To make it easier to distinguish between the layer images with purple hair, you can change the name of the layer with the initials of your text at will (see example above), by: DOUBLE CLICK TEXT on Layer> Type the name> ENTER
STEP 5: Changing COLOR COMBINATIONS
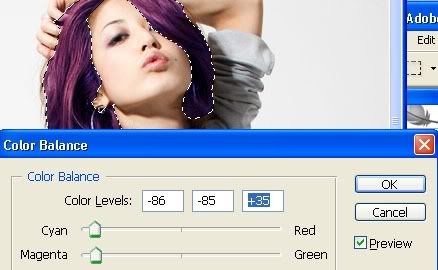
In this step you we will make an alias of different combinations of their color, you need to do is play with the six combinations of primary colors R (Red), G (Gree), B (Blue), C (cyan), M (Magenta), Y (Yellow), just simple steps:
* See the layer (layer) of new hair that you have duplicate and rename the previous
* CLICK PHOTO BOXES ONCE on the left side or CLICK ONCE Background paper copy
* Press the Ctrl (control) + "B" on your keyboard to display the Color Balance panel or you can enter the menubar Image> Adjustments> COLOR BALANCE
* After the color menu appears like the image above arrange for color composition layer mask like the example above
DONE

Free model stock from: ~Model-ARIA--STOCK

3 Comments
Thanks...This is awesome!! :-D
Replyno probs,
Replyhope you enjoy it :)
Wow! This is brilliant. I have only Gimp. May be I should find some alternative way. This is stunning. :)
ReplyGood luck with your payment too hun. It is sooo boring to wait.lol.
Facebook "like" link now! :)